 Portable Vertical Antenna
Portable Vertical Antenna
 Background:
When operating portable, one of the biggest challenges is providing an effective
antenna. Wire is great - but needs supports of some type. Trees can
be very handy for temporarily supporting wire. Sometimes trees are just
not available. You can take your own 'tree' in the form of masts or maybe
find some structure or railing to tie off on.
On a recent QRP outing I experimented with a friends (Terry - N9ZI) Buddistick™ vertical. What a beautiful piece of workmanship! After getting it setup and tuned it worked amazingly well with a single, elevated, tuned counterpoise. wire.
Knowing that I had some spare antenna components that were part of a kit that MFJ sold to make a tuned whip that attached directly to the back of a radio, I decided to try to duplicate the very effective and elegant Buddistick™.
The concept is to make the antenna self supporting and able to be broken down into small pieces for easy transport. Mine needs to fit on or into my motorcycle for trips with my PFR3 QRP rig. It needs to work on 40, 30, and 20 meters.
Here is what I came up with - Get creative and
make your own!
And, as always, YOUR MILEAGE MAY VARY!
Scroll down for more......
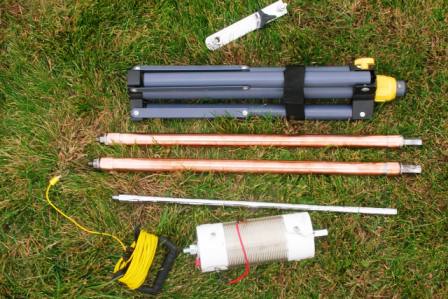
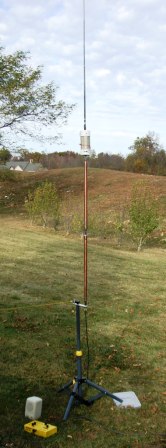
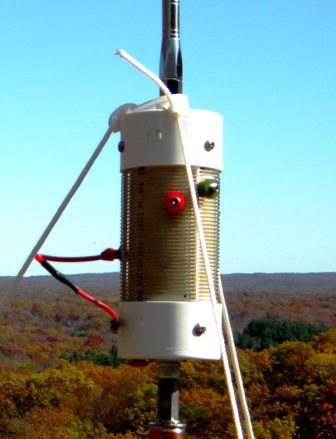
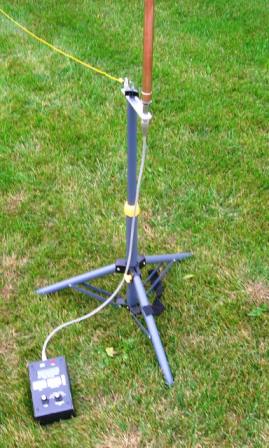
Photo shows : Antenna to tripod mount plate -
Tripod - 2 mast sections Telescopic whip - Adjustable coil - Counterpoise wire
Everything is designed to use 3/8 x 24 thread that has become a standard for antennas. This makes all of the antenna pieces and parts interchangeable.
The mast sections are made out of 3/4 inch copper pipe. This pipe is easy to work with, stiff, and everyone can either solder the fittings or knows someone who can. The 3/4 inch size accommodates the 3/8 x 24 hardware nicely. Aluminum tubing would be great but I can't work with it like I can copper. Your local hardware store will sell you 2 18 inch pieces and the 4 needed end caps. Each mast section will have a 3/8 x 24 male on one end, and a 3/8 x 24 female on the other end.
This antenna uses and assortment of 3/8 x 24 nuts, bolts,
washers, and coupling nuts for the mast sections and coil. The telescopic
whip also uses the 3/8 x 24 standard.
To make the mast sections you drill a 3/8 inch hole in
the end cap (closely centered) and use the 3/8 x 24 nuts, bolts, and coupling
nuts to complete the end caps. I found that by NOT using stainless steel
hardware, you will be able to solder these parts so that they do not loosen and
come apart when hand tightening the antenna sections together. Whether you
solder them or not, you really need to make sure that these are tight so that
they won't loosen up after the end caps are soldered onto the pipe.
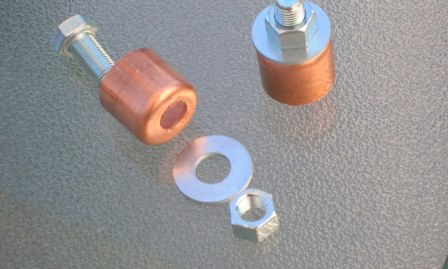
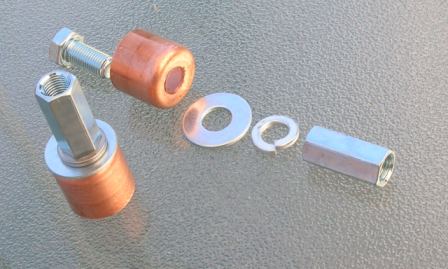
Male end cap Female end cap
Next step is to sweat solder the end caps onto the pipe. While you are at it, go ahead and sweat solder the washers, nuts, and coupling nuts such that they cannot loosen up. This is plumbers work! After all soldering is complete, a wire wheel polishes up the discolored copper, fittings, and solder.
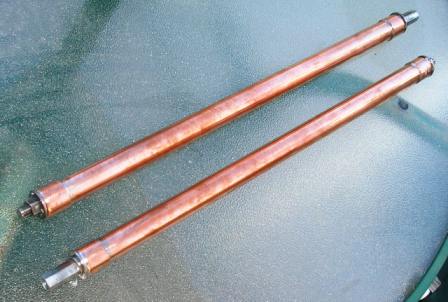
Completed mast sections
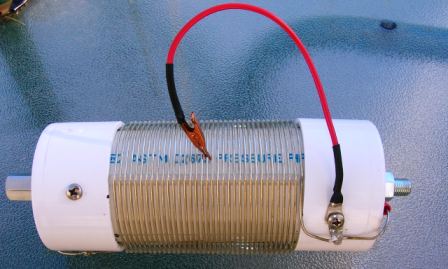
Left - Completed adjustable coil with aligator clip 'wander lead' and
3/8 x 24 hardware
Right - Updated coil with Buddipole clips and banana plug wander lead
The adjustable coil is essentially 3.5 inches of 2.5" coil stock at 10 turns per inch over 6 inches of PVC with 3/8 x 24 hardware in each end cap (bottom is male and top is female to accommodate the telescopic whip). The coil stock attaches to the hardware with 3/8" ring terminals and the "wander lead" attaches at the feed point. The original wander lead uses a flat tipped alligator clip to tune and attach to the proper coil turn. The updated configuration uses the Buddipole clips and a wander lead with a small banana plug.
NOTE: MFJ Sells a "Ultimate Portable HF Vertical" Kit that includes a telescopic whip, coil, and coil clips MFJ-1964K that can be used for this project.
You will need to mount your antenna onto a tripod. My tripod was originally designed for a portable work light and had a 1/4 x 20 threaded hole on top of the tripod. Your plate will be dependent on your tripod. I used a luggage rack mounting plate complete with the UHF connector to 3/8 x 24 coupling nut. Hamfests are a good source for these options.
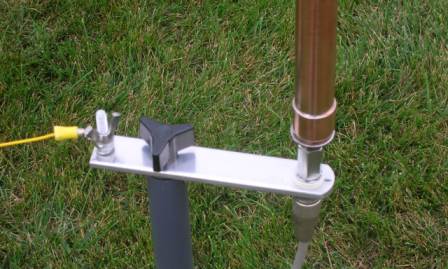
Mount with 1/4 x 20 knob and stud and wing nut for
counterpoise wire
NOTE: The Buddistick™ from Buddipole uses a plate made for a camera tripod - I would guess that you could buy the plate from them if you can't make one up.
How does it play?
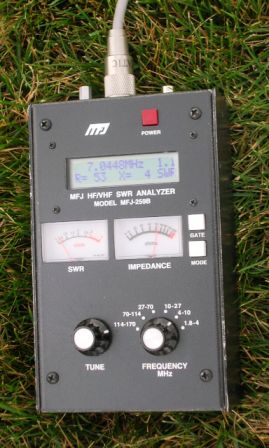 With a single 1/4 wave counterpoise wire I have
easily been able
to achieve less than 1.5:1 SWR on 40, 30, and 20 meters. Other bands are
well within reach by adjusting the coil tap, mast configuration, whip length,
etc. The counterpoise wire is an important part of tuning the antenna.
I have had best luck with the counterpoise wire about 2 foot above ground
on each end and the length at 1/4 wavelength. There
are many things to adjust and try. But then, that is the fun of it.
With a single 1/4 wave counterpoise wire I have
easily been able
to achieve less than 1.5:1 SWR on 40, 30, and 20 meters. Other bands are
well within reach by adjusting the coil tap, mast configuration, whip length,
etc. The counterpoise wire is an important part of tuning the antenna.
I have had best luck with the counterpoise wire about 2 foot above ground
on each end and the length at 1/4 wavelength. There
are many things to adjust and try. But then, that is the fun of it.
I had good luck with the antenna on my recent trip to Brown County State Park. Click here for more info on that trip.
I have developed a saying when it comes to antennas:
"It
is what it is"
It is a center load, shortened ground plain vertical antenna. As a ground
plane it should be fairly efficient. There will be some loss in the coil
versus a full 1/4 wave vertical ground plane, but this is a large diameter, 10
turn per inch, heavy coil - so losses shouldn't be too bad.
The ease of setup and the portability make this an antenna that will be fun to use and make contacts with, especially when wire supports are not available.
Photo shows 1.1:1 SWR on 7.045 mhz